Data Graph
Unify requires a Business tier account and is included with Engage.
See the available plans, or contact Support.
Segment's Data Graph is in public beta
Data Graph is in public beta, and Segment is actively working on this feature. Some functionality may change before it becomes generally available.
With Linked Profiles, you can build a Data Graph that defines relationships between any entity data set in the warehouse and the Segment Profiles you send with Profiles Sync. Make this relational data accessible to marketers and business stakeholders to empower them with the data they need to create targeted and personalized customer engagements.
Segment’s Data Graph powers Linked Events and Linked Audiences.
To help you get started with the Data Graph, view this short setup demo.
info “” Linked Profiles follows zero-copy principles, and doesn’t copy entities to store in Segment. Segment stores and processes all data in the United States.
Don’t send any personal health information with the Data Graph.
Prerequisites
To use the Data Graph, you’ll need the following:
- A supported data warehouse.
- Profiles Sync set up with ready-to-use data models and tables in your warehouse.
- Workspace Owner or Unify Read-only/Admin and Entities Admin permissions.
Step 1: Set up required permissions in your data warehouse
To get started, set up the required permissions in your data warehouse using the instructions below:
- Snowflake is supported by both Linked Events and Linked Audiences.
- Redshift and BigQuery are currently supported for Linked Events.
Linked Profiles uses Segment’s Reverse ETL infrastructure to pull data from your warehouse.
To track what data has been sent to Segment on previous syncs, Segment stores delta/diffs in tables within a single schema called _segment_reverse_etl in your data warehouse. You can choose which database/project in your warehouse this data lives in.
Step 2: Connect your warehouse to the Data Graph
To connect your warehouse to the Data Graph:
- Navigate to Unify > Data Graph. This should be a Unify space with Profiles Sync already set up.
- Click Connect warehouse.
- Select your warehouse type. Note: Linked Audiences only supports Snowflake.
- Enter your warehouse credentials.
- Test your connection, then click Save.
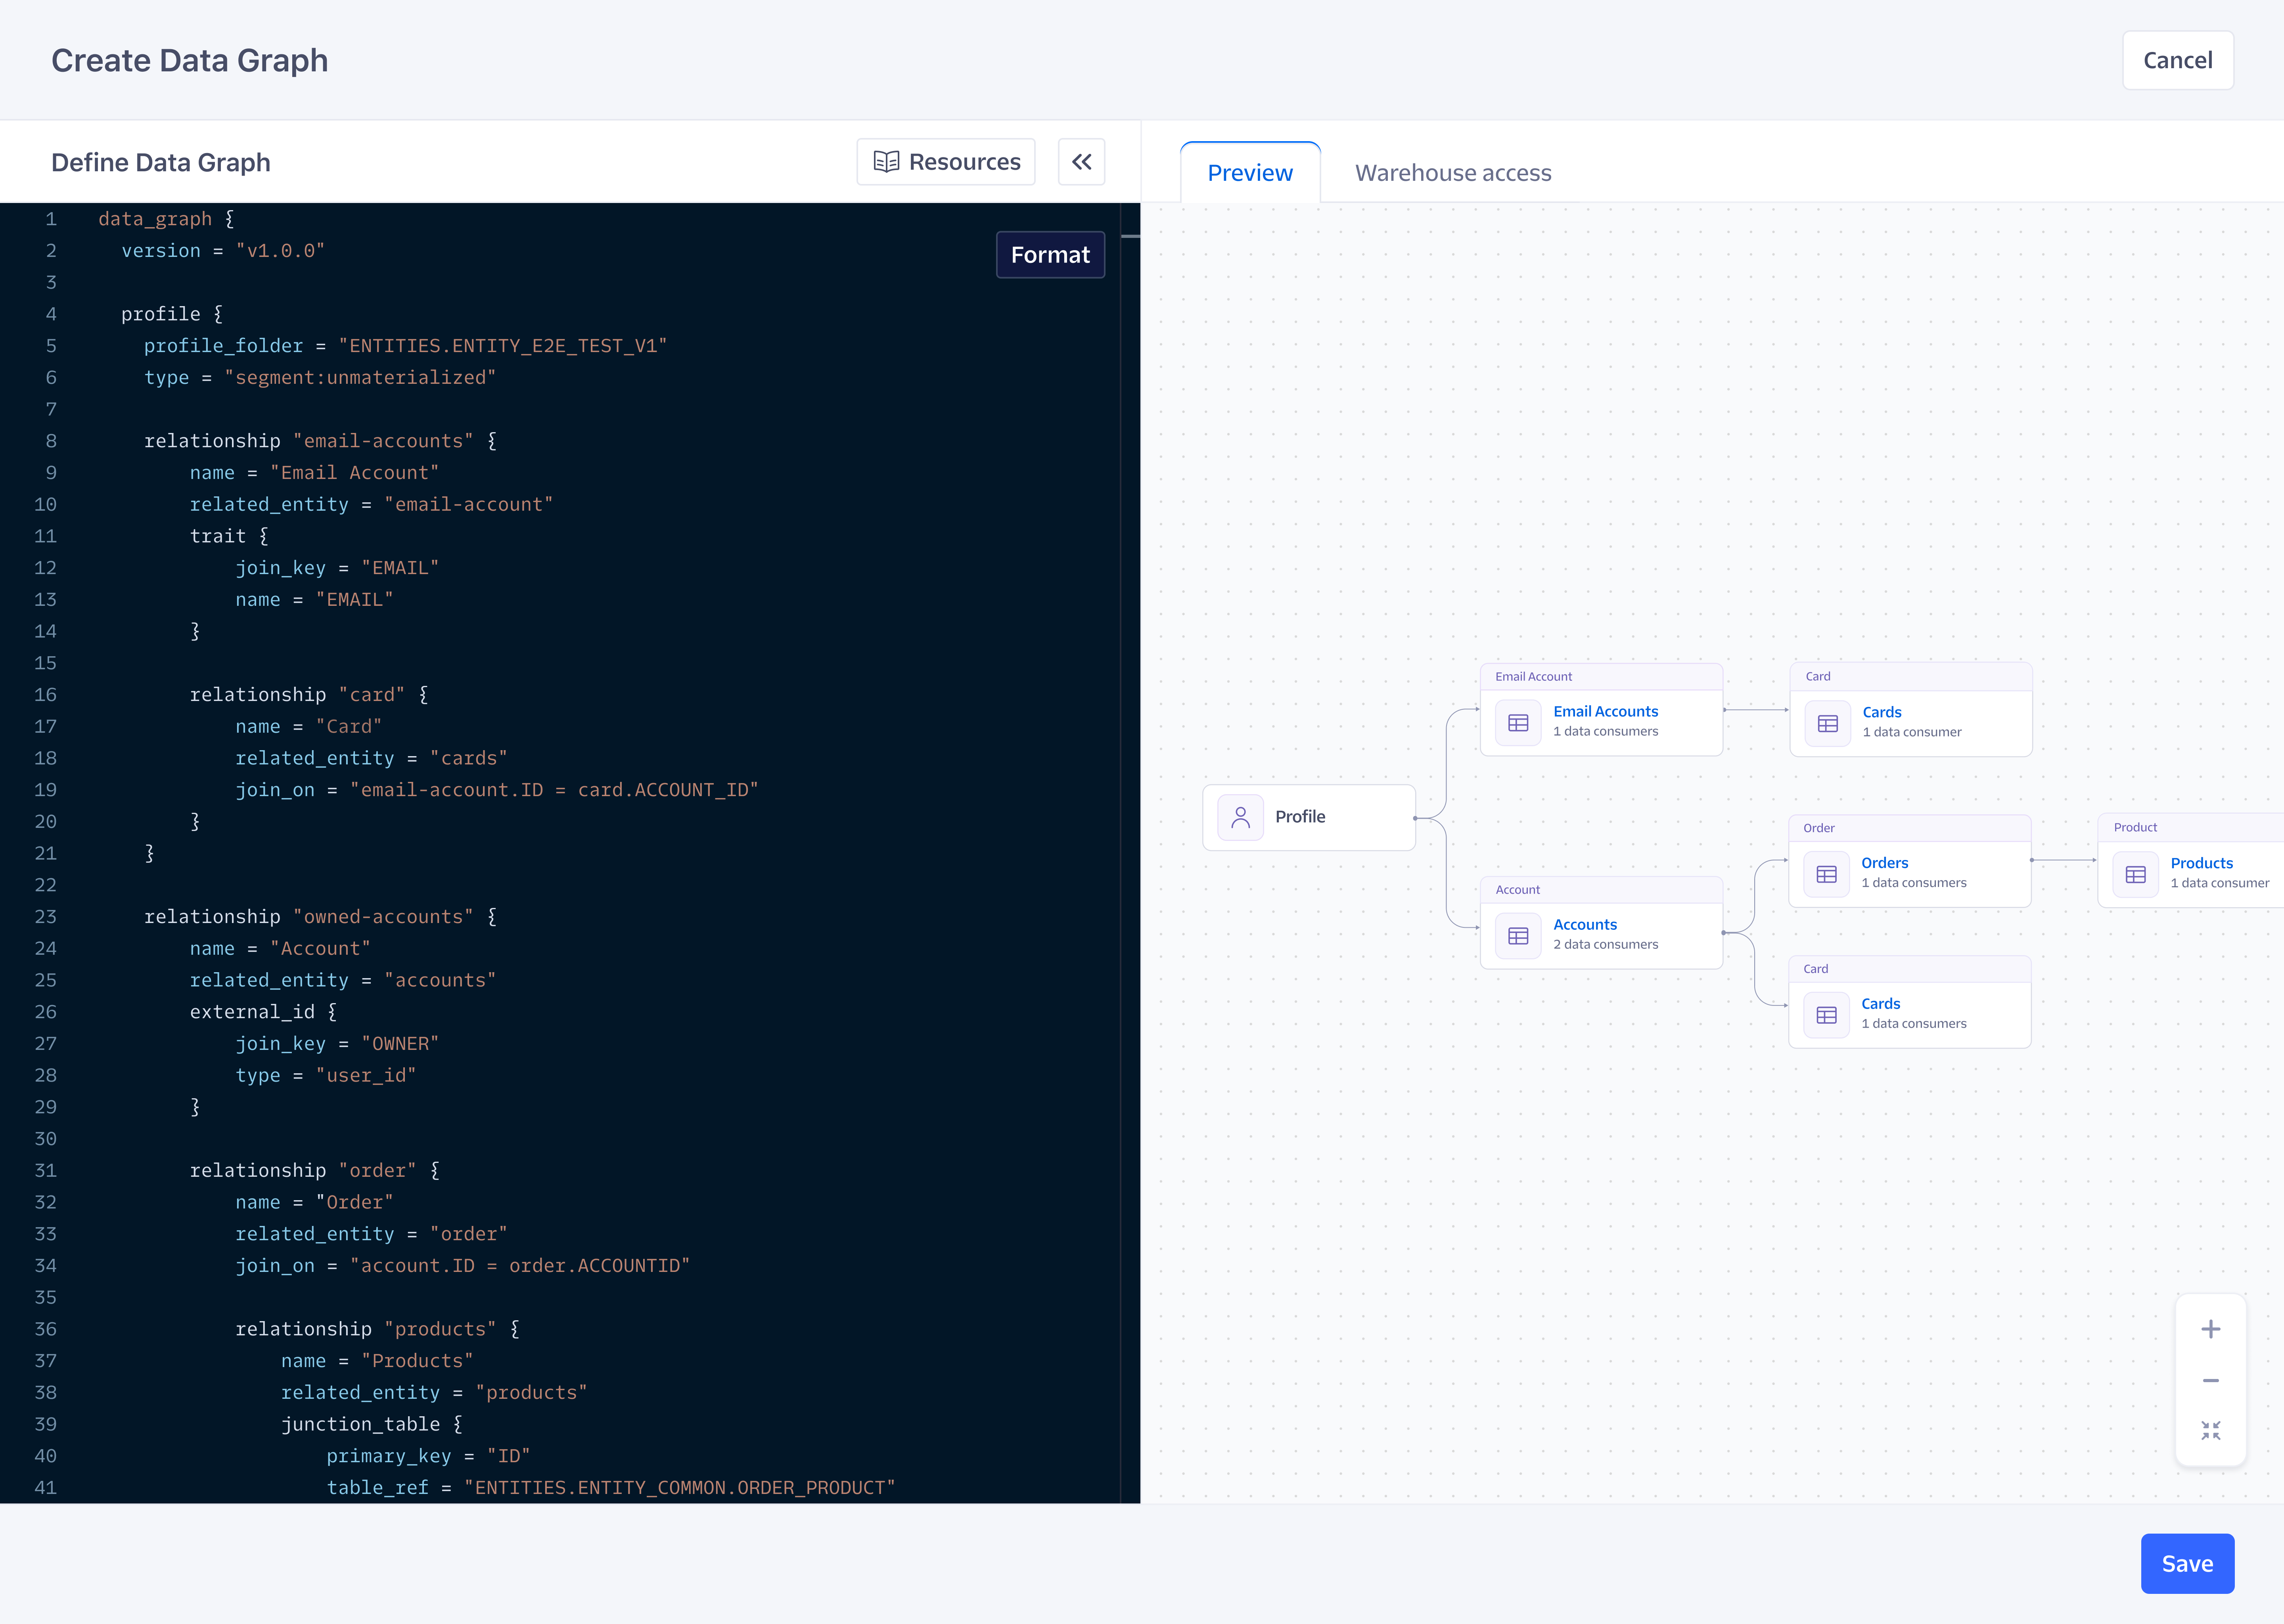
Step 3: Build your Data Graph
The Data Graph is a semantic layer that represents a subset of relevant business data that you’ll use for audience targeting and personalization in downstream tools. Use the configuration language spec below to add models to build your Data Graph. The Data Graph currently supports 4 layers of depth, including the Profile entity. Warehouse schemas are case sensitive, so you’ll need to reflect the schema, table, and column names based on how you case them in the warehouse.
Define entities
Use the parameters, definitions, and examples below to help you define entities.
Profile
The profile is a special class of entity that is always defined at the top of the Data Graph, and there can only be one profile for a Data Graph. The profile entity corresponds to the Profiles Sync tables and models, such as profile traits.
The parameters are:
| Parameters | Definition |
|---|---|
profile_folder |
This is the fully qualified path of the folder or schema location for the profile tables. |
type |
Identifies the materialization methods of the profile tables (segment:unmaterialized, segment:materialized, segment:dbt). Note: Leveraging materialized profile tables optimizes warehouse compute costs. |
Example:
# Define a profile entity

profile {
     profile_folder = "PRODUCTION.segment"
     materialization = "none"

}
Entity
An entity is a stateful representation of a business object. The entity corresponds to a table in the warehouse that represents the entity.
| Parameters | Definition |
|---|---|
entity |
A unique slug for the entity, which is immutable and treated as a delete if you make changes. The slug must be in all lowercase, and supports dashes or underscores (for example, account-entity or account_entity). |
name |
A unique label that displays throughout your Segment space. |
table_ref |
Defines the table reference. In order to specify a connection to your table in Snowflake, a fully qualified table reference is required: [database name].[schema name].[table name]. |
primary_key |
The unique identifier for the given table. Should be a column with unique values per row. |
(Optional) enrichment_enabled = true |
Indicates if you plan to also reference the entity table for Linked Events. |
Example:
# Define an entity and optionally indicate if the entity will be referenced for Linked Events (event enrichment)

data_graph {
# Entities are nested under the data_graph
entity "account-entity" {
     name = "account"
     table_ref = "PRODUCTION.CUST.ACCOUNT"
     primary_key = "id"
     enrichment_enabled = true
}

profile {
# Relationships are nested under the profile
}
}
Relate entities
Use the following relationship, parameters, and examples to help you relate entities.
Relate Entity to Profile
| Parameters | Definition |
|---|---|
relationship |
A unique slug for the relationship, which is immutable and treated as a delete if you make changes. The slug must be in all lowercase and will support dashes or underscores (for example, user-account or user_account). |
name |
A unique label that displays throughout your Segment space. |
related_entity |
References your already defined entity. |
A profile can be related to an entity in two ways:
1. With an external_id: Define the external ID that will be used to join the profile with your entity.
type: Identify the external ID type (email,phone,user id). This corresponds to theexternal_id_typecolumn in yourexternal_id_mappingtable.join_key: This is the column on the entity table that you are matching to the external identifier.
Example:
data_graph {
     #define entities

     profile {
          #define profile

          #Option 1: Relate account to profile with an external ID
          relationship "user-accounts" {
               name = "Premium Accounts"
               related_entity = "account-entity"
               external_id {
                    type = "email"
                    join_key = "email_id"
               }
          }
2. With a trait: Define a profile trait that will be used to join the profile with your entity.
name: The trait name that corresponds to a column name in yourprofile_traits_updatestable.join_key: This is the column on the entity table that you are matching to the trait.
Example:
data_graph {
     #define entities

     profile {
          #define profile

          #Option 2: relate account to profile with a trait`
          relationship: "user-accounts" {
               name = "Premium Accounts"
               related_entity = "account-entity"
               trait {
                    name = "cust_id"
                    join_key = "id"
               }
          }
     }
}
Relate between entities
| Parameters | Definition |
|---|---|
relationship |
A unique slug for the relationship, which is immutable and treated as a delete if you make changes. The slug must be in all lowercase and will support dashes or underscores (for example, user-account or user_account). |
name |
A unique label that displays throughout your Segment space. |
related_entity |
References your already defined entity. |
join_on |
Defines relationships between two entity tables [lefty entity name].[column name] = [right entity name].[column name]. Note that the entity name is a reference to the alias provided in the config and doesn’t need to be the fully qualified table name. |
Example:
data_graph {
     #define entities
     profile {
          #define profile
               ...
               #relate account to carts
               relationship "Carts" {
                    name = "Shopping Carts"
                    related_entity = "cart-entity"
                    join_on = "account.id = cart.account_id"
               }
          }
     }
}
Relating entities with a junction table
If you’re relating entities with a junction table:
| Parameters | Definition |
|---|---|
junction_table |
Defines the table reference to the join table. In order to specify a connection to your table in Snowflake, a fully qualified table reference is required: [database name].[schema name].[table name]. |
table_ref |
Defines the table reference to the join table. In order to specify a connection to your table in Snowflake, a fully qualified table reference is required: [database name].[schema name].[table name]. |
primary_key |
The unique identifier on the join table, and should be a column with unique values per row. |
left_join_on |
Defines the relationship between the two entity tables: [left entity name].[column name] = [junction table column name]. |
right_join_on |
Defines the relationship between the two entity tables: [junction table column name] = [right entity name].[column name]. |
Note: schema.table is implied within the junction table column name and doesn’t need to be provided.
Attributes from a junction table are not referenceable with the Audience Builder. If you’d like to reference an additional column on the junction table for filtering, you must first define it as an entity and explicitly define a relationship name.
Example:
data_graph {
     #define entities
     profile {
          #define profile
               ...
               #relate products to carts with a junction table
               relationship "products" {
                    name = "Purchased Products"
                    related_entity = "product-entity"
                    junction_table {
                         primary_key = "id"
                         table_ref = "PRODUCTION.CUSTOMER.CART_PRODUCT"
                         left_join_on = "CART.ID = CART_ID"
                         #schema.table is implied within the cart_id key
                         right_join_on = "PRODUCT_ID = PRODUCT.SKU"
                    }

               }
          }
     }
Step 4: Validate your Data Graph
Validate your Data Graph using the config builder and preview, then click Save.
Data Graph example
data_graph {
     version =  "v1.0.0"

#define a profile entity
     profile {
          profile_folder = "PRODUCTION.segment"
          type = "segment: materialized"

          #relate accounts to profiles with an external ID
          relationship "user-accounts" {
               name = "Premium Accounts"
               related_entity = "account-entity"
               external_id {
                    type = "email"
                    join_key = "email_id"
               }

               #relate carts to account
               relationship "user-carts" {
                    name = "Shopping Carts"
                    related_entity = "cart-entity"
                    join_on = "ACCOUNT.ID = CART.ACCOUNT_ID"

                    #relate carts to products with a junction table
                    relationship "products" {
                         name = "Purchased Products"
                         related_entity = "product-entity"
                         junction_table {
				          primary_key = "id"
                              table_ref = "PRODUCTION.CUSTOMER.CART_PRODUCT"
                              left_join_on = "CART.ID = CART_ID"
                              #schema.table is implied within the cart_id key
                              right_join_on = "PRODUCT_ID = PRODUCT.SKU"
                         }
                    }
               }
          }
     }

     #define account, product, and cart entities
     entity "account-entity" {
          name = "account"
          table_ref = "PRODUCTION.CUST.ACCOUNT"
          primary_key = "id"
          enrichment_enabled = true
     }

     entity "product-entity" {
          name = "product"
          table_ref = "PRODUCTION.PROD.PRODUCT_SKUS"
          primary_key = "sku"
          enrichment_enabled = true
     }

     entity "cart-entity" {
          name = "cart"
          table_ref = "PRODUCTION.CUST.CART"
          primary_key = "id"
     }
}
Edit your Data Graph
To edit your Data Graph:
- Navigate to Unify > Data Graph.
- Select the Builder tab, and click Edit Data Graph.
A data consumer refers to a Segment feature referencing entities and relationships from the Data Graph.
Breaking changes
A breaking change occurs when deleting an entity or relationship that is being referenced by a data consumer. Note that an entity or relationship slug is immutable and treated as a delete if you make changes. Data consumers affected by breaking changes will fail on the next run.
Potential breaking change
Editing the Data Graph may lead to errors with data consumers. If there’s a breaking change, the data consumer will fail on the next run. Unaffected data consumers will continue to work.
Next steps
After you’ve set up your Data Graph, get started with Linked Events and Linked Audiences.
This page was last modified: 11 Jun 2024
Need support?
Questions? Problems? Need more info? Contact Segment Support for assistance!